


[2] How to enable WiFi in Windows Server 2019
In this step-by-step guide, learn how to enable WiFi in Windows Server 2019. By default, wireless capabilities are missing on the server..
If you're using Windows Server 2019 and want to add wireless functionality to it,
When you install Windows Server, you may only see Ethernet (wired) capabilities.
It appears that the wireless card has been disabled by the server. After that, if you open Device Manager and expand Network Adapter, you will find that the system does not recognize the wireless driver. They usually have exclamation marks on their entries or move to the "Other devices" section instead of the "Network adapters" section.
The question then is how to enable wireless functionality on Windows Server? Well, the answer is simple, if you know it! Basically, you need to enable the wireless functionality using the server manager. These features are not enabled by default, which is what causes the lack of WiFi. Try the steps mentioned below,
This will help you enable WiFi.
Steps
1. Open the server Manager. In the console, click Add Roles and Features.
2. In the Add Roles and Features Wizard window, click Next in the Before You Start section.
3. Then select "Install Type" for role-based or feature-based installation and click "Next".
4. Now, under "Server Selection", select the target server in the next screen and continue.
5. Under "Server Role", click "Next" without any selection. You will then be taken to the "Features" TAB. Scroll down, find, and then check for wireless LAN services.

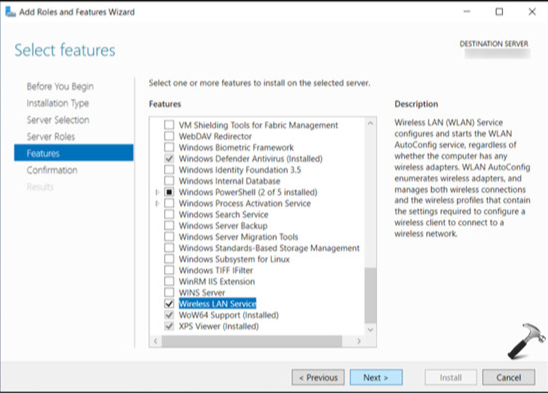
6. Then under Confirm, click the Install button.
7. On the Results TAB, you will see within seconds that the feature is installed. Click the Close button, and restart Windows Server.
8. After restarting Windows Server, you should already be able to use WiFi. If you see WiFi on the login screen but can't find it after logging in, you'll need to perform a network reset.
9. If the driver is running normally and can not search WiFi, use the command line to start WLAN service "win+R" to open the running bar and enter "cmd" to open the command prompt.
9.1 start the WLAN AutoConfig service. You can start the service with the following command: start WlanAutoConfig


Be the first to receive exclusive discounts and news